Visit My Store Contact Entertaining Recipes About Me Home

Chocolate Chip Cookies


The smell of cookies baking is something not to be missed. I never baked cookies at home. We always bought them from the store. Recently I went into this baking spree and wanted to try everything that can be baked. This was one of my initial things to try and tasting the way they turned out, I have been baking cookies at home ever since. They are nothing when compared to the store bought ones. You have to try out to know the difference.

ChocolateChipCookies


Total Time: 30-40 min (including baking time)
Makes: 5 dozen cookies

Ingredients:

3/4 cup light brown sugar, firmly packed
3/4 cup granulated sugar
1 cup / 2 sticks butter, softened
1 tsp vanilla extract
2 large eggs
1/2 tsp salt
1 tsp baking soda
2 1/4 cups All-Purpose Flour
2 cups semisweet chocolate chips (I use 1 cup as we don't prefer so may chips)

Method:

  1. Preheat the oven to 375°F. Lightly grease (or line with parchment) two baking sheets.
  2. In a large bowl/stand-mixer, mix together both sugars, butter, and vanilla extract, beating until smooth and creamy.
  3. Add eggs one at a time beating in-between. Beat for 1-2 min.
  4. Mix in the flour, baking soda and salt slowly, beating continuously. Finally mix in the chips.
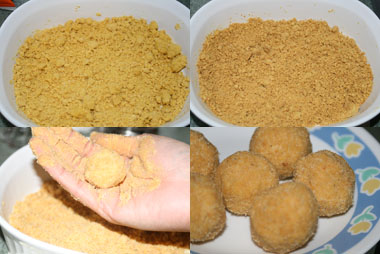
  5. Use a spoon to scoop 1 1/4" balls of dough onto the prepared baking sheets, leaving 2" between them on all sides; they'll spread.
  6. Bake the cookies on top rack of your oven for 10 to 11 minutes, till their edges are chestnut brown and their tops are light golden brown. If you want them chewy and soft - bake for 10 min and if you want them crispy - bake for 11-12 min. Remove them from the oven, and cool on the pan till they've set enough to move without breaking. Repeat with the remaining dough.

Tips

When I started making cookies I always got my cookies burnt. I tried it 2-3 times and they would always burn. If I cook for lesser time, the tops were not cooked completely and when cooked for the specified time, the bottoms were burnt. Then I came across these airbake cookie sheets by WearEver which I tried and was amazed by the way they cooked. No more burnt cookies.

Here's a link to where it can be bought from. There are various sizes available but I like these 20-inch ones as they fit my oven completely avoiding any space wastage.

Quesadillas


Whenever I go to Uno's here in the US, I always order their Farmers Market Deep Dish Pizza....I know...I know...its full of calories....but then I don't go to Uno's so often.....maybe once in 6 months. So I guess its OK. Anyways, this time when we went there I wanted to try something different and so I ordered Roasted Vegetable Quesadilla. I liked it a lot and decided that I have to try and make it at home because well....you know...Home cooking is healthier...:-)

Then I came across Ashlee's recipe and decided that I had to cook these. I made slight modifications to it. So here I was trying out this recipe. And it turned out amazing. Even my daughter ate all of it.

I like to use multi-colored peppers to give more colors, but the day I made these I had only green peppers in my fridge - so I used only those. Thats why the vegetable filling looks so green.


Quesadillas


Preparation Time: 15 min
Cooking Time: 15 min
Serves: 4

Ingredients:

4 tortillas of choice - flour or wheat

Vegetable Filling
1 onion, chopped fine
1 red bell pepper
1 yellow bell pepper
1 cup frozen/baby spinach
1 tblsp Olive oil
salt to taste
black pepper to taste
1/2 tsp garlic powder

Cheese Spread
10-12 pieces sundried tomtaoes, reconstituted (Put them in hot water for 10 min)
1/2 cup tofu, chopped
1/2 cup cheese of choice - mozarella, cheddar, parmesan
3-4 garlic cloves, peeled and chopped
Salt to taste
black pepper to taste


Method:

  1. Saute onions in a olive oil till transluscent.
  2. Add the rest of the vegetables and stir-fry till soft and completely dry of water.
  3. Add salt and pepper.
  4. Pulse all the ingredients under spread to a crumpled mixture.
  5. Heat a griddle. Spray oil on a tortilla and place it on the hot griddle. Let it cook lightly on one side - about 30-40 sec. Flip it over and cook the other side till you can see small bubbles forming. Now sprinkle a little cheese on one half. Put 2-3 tblsp of vegetable filling on top of this. Top it with 1-2 tblsp cheese spread. If you like sprinkle a little more cheese on top of this. Cover this with the other half of the tortilla. Cook both sides till slightly crisp and brown.
  6. Cut into 3 traingles (like a pizza slice) and serve hot with sour cream.
QuesadillasProcess


Tips

  • You can add whatever vegetables you like.

Cooking Rice in a Microwave


When I came to US, one of the things I saw is the variety of gadgets they have in stores here for microwave cooking - omelette maker, egg boiler, rice cooker etc. Since I don't cook eggs as much, I bought a microwave rice cooker. When I first used it, I was amazed with its ease. And the quality of rice that came out of it was equivalent to that of an electric rice cooker. You don't have to keep a watch on the rice cooking on the stove or keep an ear open for the pressure cooker whistle to go off. Just set the time and you are done. A perfect bowl of rice is ready.

When I started blogging, I realised that many readers (esp people in India) wouldn't have a microwave rice cooker. So I tried to make rice using a microwave safe bowl - and voila, the results were the same with the same ease. So here is my way of cooking rice in the microwave.

One thing to note is that the wattage of your microwave might make a difference in the time required. I have a 1300W microwave, but I decrease its power level to 7 when making rice.


Total Time: 10-25 min (depending on quantity of rice)

Ingredients:

Rice - as per how much you want to make
Water - double the rice + a little more

Here are my proportions
1/2 cup rice with 1 cup + 2 tblsp water
1 cup rice with 2 1/4 cup water
1 1/2 cup rice with 3 1/2 cups water
and so on ...


Method:

  1. Take a microwave safe bowl. Rice expands on cooking. So take a bowl large enough for rice and water plus have a little extra space for boiling and expanding.
  2. Wash rice a couple of times. Add water. Some like to soak rice for sometime before cooking. I usually am in a hurry, so never do it.
  3. Microwave on power 7 (based on my microwave of 1300W). The time is based on the amount of rice. The times I use are

         1/2 cup rice -------- 8 min
         1 cup rice -------- 10 min
         1 1/2 cups rice -------- 15 min
         2 cups rice -------- 20 min

  4. Once the microwave is done, let the rice remain in for about 4-5 min before digging in. This resting period cooks the rice to its best.
  5. All done - Serve

Tips

  • During boiling there might be a little water spillage in the microwave if the bowl used is smaller. This is OK.
  • Left-over rice in the fridge often looses moisture and becomes hard. Add about 1/2 cup water and microwave 4-5 min. It will be soft again.
  • The microwave cooker that I use is shown below.


Microwave Besan Laddu


Well....We have all made these using the regular kadai/wok. But making it in a microwave was a completely different experience.

MicrowaveBesanLaddu


Total Time: 30 min (includes cooling time)
Makes 12 pcs

Ingredients:

1 cup besan/gram flour
3/4 cup sugar - powdered if its big grained one
1/4 cup ghee
1/4 tsp elaichii powder
1/4 cup raisens, cashews, almonds - optional


Method:

  1. Mix ghee and besan in a microwave safe bowl. Try to break as many lumps as you can.
  2. Microwave for 1 min. Take it out and mix well. It will be very easy to break all the lumps now.
  3. Microwave for 5 more minutes stirring after every min. Time might vary depending on microwave wattage. The one I used is 1300W and it took me 6 min for the besan to be cooked. Be around the microwave and keep checking. When the besan has changed color and gives a nice aroma - thats an indication that its done.
  4. Cool it completely. Add sugar, elaichii, raisins and chashews. Mix well.
  5. Make small balls like laddu's with your hand. If the mixture has gotten too dry and not holding together add a little melted ghee.
MicrowaveBesanLadduProcess


Spicy Dum Alu


We had a potluck once at my work back in India. This colleague. Nilesh got Dum Alu's made by his sister and they were an instant hit. I was not much into cooking those days but took the recipe. This sheet has been with me for all these years. Recently when we had a get together at a friend's house here, I thought of finally trying this out. I seem to have forgotton the taste of what I had, but this turned out good too. I made a few changes to the original based on my experience.

SpicyDumAlu


Total Time: 50-60 min
Serves: 4-5

Ingredients:

8-10 baby potatoes
1 tsp Amchur / dry mango powder
1 tblsp tandoori masala
4 tblsp oil
Salt to taste
1/2 cup water
1/2 cup milk
1/2 cup dhaniya/cilantro leaves, chopped for garnishing

Onion paste
2 onions, chopped into 4
2 tblsp cashew nuts
2 badi elaichii
1" ginger or 1 tsp ginger paste
5-6 garlic cloves or 1 tsp garlic paste
2-3 green chilies
1/2 cup grated coconut
2 tblsp dhaniya powder
1 tsp red chili powder
1 tsp cumin seeds
1 tsp turmeric
1/2 tsp garam masala
2 tblsp poppy seeds - optional
1 tsp Kasurimethi / fenugreek leaves - optional


Method:

  1. Take onion, cashews and elaichii in a microwave-safe bowl along with 1/2 cup water. Microwave for 5 min. You can also boil in a pan on gas-stove. Cool and grind with all the ingredients under Onion paste to a smooth paste.
  2. Boil baby potatoes. Peel and let it cool so that they harden a little. This is to ensure they don't break when you make holes in them. Once cooled take a toothpick and make holes in the potatoes. This is so the gravy seeps in the potatoes. If you like you can shallow fry these potatoes - I normally don't do that.
  3. Heat oil in a pan and fry the onion paste till it gives out a nice aroma. Do not hurry. Cook on medium-high heat.
  4. Add milk, water and salt. You can increase these amounts based on the consistency of the gravy you want. Simmer and let it boil for 5-6 min.
  5. Add potatoes, amchur and tandoori masala. Let it cook on slow heat for about 8-10 min.
  6. Garnish with dhaniya leaves and serve.
SpicyDumAluProcess


Tips

  • If you don't have baby potatoes, take normal potatoes and cut them into smaller sizes.

Kala Chana


I have never made Kala Chana. I have eaten it many times in temples with grated coconut and always liked it a lot but somehow never got to making it. Yesterday being Ashtami, I made puri, halwa and Kala Chana to go with it - not the one with coconut but spicy Kala Chana with gravy. This can go with dry Indian breads or rice.

KalaChana


Preparation Time: 15 min (not including the soaking time)
Cooking Time: 40-45 min (includes 20-25 min of pressure cook)
Serves: 2-3

Ingredients:

1 cup Kala Chana, soaked for 3-4 hours
1 large onion, chopped fine
1 tsp ginger paste
1 tsp garlic paste
1 tsp jeera / cumin seeds
2 large tomatoes, pureed
1 tsp Garam masala
Salt to taste
1 tblsp oil


Method:

  1. Pressure cook soaked kala chana with 4 cups water for about 20-25 min on slow heat till soft.
  2. Heat oil in a pan. Add jeera and let it sparkle. Saute onions till transluscent. When the onions are almost done, add ginger and garlic paste.
  3. Add pureed tomatoes and cook till oil separates.
  4. Add boiled Kala Chana. Don't add the extra water in the chana. Keep it aside.
  5. Let it boil for 2-3 min. Add garam masala and boil for another 2-3 min.
  6. Add left-over water of the chana, based on the consistency required.
  7. Serve with roti/puri/rice.

Rava / Suji Halwa


It was Ashtami yesterday and so I had to make this along with Puri and Kala Chana.

Suji Halwa is often made on religious occasions as prasad (offering to God). Its very easy to make and tasty to eat. I make it often when I have a sweet craving and there's no sweet around. :-)


SujiHalwa


Total Time: 10-15 min
Serves: 4

Ingredients:

1 cup rava
1 cup sugar
2 tblsp ghee
2 1/2 cup water
1/4 cup grated coconut, Almonds and Cashews (optional)


Method:

  1. Heat ghee in a pan and fry rava till golden.
  2. Add water and let it boil.
  3. When it thickens add sugar. It will liquify again. Let it boil to solidify to desired consistency.
  4. Decorate with grated coconut, Almonds and Cashews.