Visit My Store Contact Entertaining Recipes About Me Home

Vegetable Lasagna


I have always loved Stouffers's Vegetable Lasagna. I have tried other brands when I didn't find this, but nothing compares to this. Sadly, I don't find it in the grocery store whenever I look for it. So I had to find a recipe to make it and I found one sometime back. It has been lying on my Kitchen shelf for some days now. I finally gave it a try yesterday. It turned out very well. I did make a few changes to it based on my taste buds.


Preparation Time: 30 min
Cooking Time: 40-45 min
Serves: 6-8

Ingredients:

about 5 cups White Sauce
     3 tblsp Butter
     1 cup All purpose flour
     6 cups milk
1/2 tsp Garlic powder
8 lasagna noodles, cooked
8 oz Cottage Cheese
16 oz Ricotta cheese
1 cup mozarella cheese
1 cup Parmesan Cheese
1 small bag frozen chopped spinach, thawed
1 Green pepper, chopped
1 Red pepper, chopped
2 Broccoli heads, chopped
2 carrots, sliced in circles
1 large Onion, chopped
2 tblsp minced Garlic
1/2 cup bread crumbs
salt and pepper to taste
1 tsp basil
1 tsp oregano
1/2 tsp crushed red pepper
1 tsp Olive Oil


Method:

  1. Preheat oven to 375 F.
  2. Prepare white sauce. Towards the end, add spinach, garlic powder, salt and pepper. Mix and keep aside.
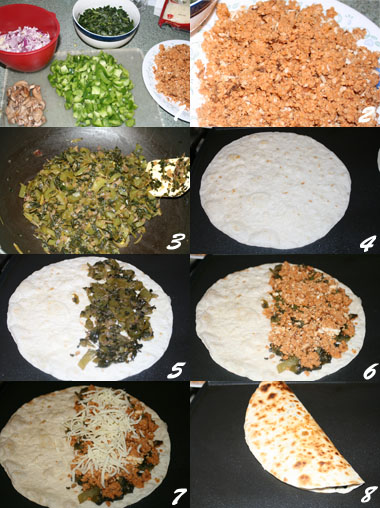
  3. Stir fry the vegetables in a little oil. Add parmesan cheese, basil, oregano, crushed red pepper, salt and pepper. Keep aside.
  4. Mix cottage and Ricotta cheeses in a bowl. Keep aside.
  5. Spread 1 1/2 cup white sauce mixture in a 9 X 13 baking pan.
  6. Layer noodles, ricotta mixture, veggies, 1 1/2 cup white sauce mixture and mozzarella cheese, ending with noodles.
  7. Top with left over white sauce mixture.
  8. Spread bread crumbs on top.
  9. Bake uncovered for about 40-45 min till the top starts to brown a little. Cool for about 10 min before serving.

Tips

  • Try various veggies like zucchini, asparagus, mushrooms based on your taste buds.
  • Increase or decrease spices based on taste.
  • Increase or decrease cheese based on choice.

Cheesy Creamy Pasta Sauce


I am always on a hunt to find things that can be made quickly plus something that would appease my daugters. My older one is a picky eater. Well she loved this .... maybe because I didn't add any veggies to it or maybe because show likes cheesy stuff....Whatever.... I got another recipe that can be packed for school lunch.


Preparation Time: 0
Cooking Time: 5-10 min
Serves: 3-4

Ingredients:

2 tblsp butter
1 cup heavy cream
1/2 cup parmesan cheese
1/2 cup mozzarella cheese
2 tsp dried basil
4 cloves garlic flakes, minced
salt and pepper to taste


Method:

  1. Heat butter in a non-stick pan.
  2. Add garlic, cheeses and basil to blend well. Keep stirring.
  3. Add cream, salt and pepper and blend well.
  4. Toss over your favorite pasta.

Mooli ki besan ki sabzi


I like this version of mooli(white radish) but my husband in general doesn't like mooli. So I have never made it. Now I had a mooli in my fridge and I didn't want to make mooli ke parantha as always, so I made this yesterday and wow!!!! I once again remembered how yum this tasted when my mom made it.


Preparation Time: 15 min
Cooking Time: 15-20 min
Serves: 2-3

Ingredients:

1-2 mooli, grated
1 pinch hing
1 tsp jeera
1/4 tsp haldi/turmeric
1 tsp amchur/mango powder
2 tblsp oil
2 tsp ghee
2 tblsp besan/gram flour
salt to taste


Method:

  1. Roast besan in ghee till light brown. Keep aside.
  2. Heat oil in a frypan and add hing and jeera. Let it splutter. Add haldi and amchur.
  3. Add the grated mooli and let it cook till all the water evaporates and mooli looks dry.
  4. Add roasted besan and fry 3-4 min. Done!!!

Puram Puri / Puran Poli


Well!!! What can I say about Puram Puri. I just love them. I always make extra stuffing so that its left over and I can eat later on. :))))


Preparation Time: 40-50 min
Cooking Time: 30 min
Serves: 4-5 (makes about 6 savory puris and about 10 sweet puris)

Ingredients:

1.5 cup Chana Dal - 1 cup for sweet and 1/2 cup for savory puris
3 cups water
1 tblsp Ghee
1 cup sugar
1 tsp elaichii powder
2 cups Atta / Whole Wheat flour OR 1 cup wheat flour and 1 cup maida


Method:

Chana Dal stuffing

  1. Pressure cook Chana dal with water for about 20-25 minutes.
  2. Strain the dal.
  3. Heat ghee in a pan and add cooked dal.
  4. Mash well. Fry till desired consistency is achieved. It should be dry enough so that it doesn't come out when rolling.
  5. Remove about 1/2 cup worth chana dal - for savory puris
  6. To make sweet puris, add sugar and fry till all the extra water due to sugar has evaporated. Add elaichii. Mix well and keep aside.
  7. To make savory puris, to the separated dried dal, add 1/4 tsp, hing, 1/2 tsp sof powder, 1/2 tsp amchur powder, 1/2 tsp garam masala, salt and mix well.
Make puris or rotis

  1. Knead atta with ghee and water to make a soft dough.
  2. You can either make puris or rotis(poli). When making puris, roll 2 puris, place 1 puri flat and place a little stuffing in the center, cover with the second puri and seal the ends. Deep fry this in hot oil.
  3. When making roti (poli), take a little dough, flatten it a little with hand, place a little stuffing in the center and seal all the ends together bringing them on top of the stuffing like a parantha. Fry it in a pan using a little oil/ghee.

Gobhi Manchurian


Its surprising that I never made this till now. I always made vegetable manchurian, never gobhi. But it turned out out pretty tasty.


Preparation Time: 10 min
Cooking Time: 20-30-min
Serves: 3-4

Ingredients:

1 small gobhi / cauliflower florets
oil for deep frying

Batter for dipping
3/4 cup all purpose flour
1 tblsp cornflour
1 medium onion finely chopped
1 tsp ginger-garlic paste
salt to taste

Final tempering
1 medium onion finely chopped
1 tsp ginger-garlic paste
2 tblsp soy sauce
1 tblsp green chilli sauce
3 tblsp tomato ketchup
2 tblsp oil
finely chopped dhaniya/cilantro leaves
salt to taste


Method:

  1. Mix all ingredients under batter along with water to make a thick batter.
  2. Dip gobhi/cauliflower florets in this batter and deep fry till golden brown. Keep aside.
  3. Heat 2 tblsp oil in a stir-fry pan and saute onions. Add ginger-garlic paste.
  4. Fry for 1-2 min and add soysauce, chilli sauce, tomato ketchup and salt. Fry for another 2 min.
  5. Add fried gobhi florets. Mix well. Garnish with dhaniya leaves. Serve hot with veg soft noodles or chinese fried rice.

Tips

  • To make manchurian in a gravy, add 1 tblsp cornflour mixed with 1 1/2 cup water during tempering. Boil well till the gravy becomes transparent. Add the fried florets now.

Stuffed Tomatoes


Making Stuffed tomatoes is the same as Stuffed Peppers. You decide the filling, stuff it in a tomato and cook it till tender. Thats it!!! I normally make stuffed pepper and tomotoes as one dish - creates color in a platter when serving.

Ingredients:

2-3 hard tomotoes(not old ones that get softer)
1 tsp Jeera
1 Onion, chopped fine
1/2 tsp Turmeric
1/2 tsp Amchur / Dry Mango powder
1/2 tsp Garam Masala
4 tblsp Tomato Sauce
Salt to taste

For Stuffing
1 tsp Jeera
1 tsp Dhaniya Powder
2 tsp Sof / Fennel Powder
1 tsp Amchur / Dry Mango powder
1 tsp Garam Masala
2 tsp Roasted Besan / Gram Flour
2-3 medium Potatoes, boiled and mashed coarsly
1 cup Paneer, grated Salt to taste

Method:

Make Stuffing

1. Heat oil in a pan, add jeera and let it splutter. Saute onions till transluscent.

2. Add dhaniya powder, sof, amchur, garam masala and besan. Fry till besan turns golden.

3. Add salt, potatoes and grated paneer. Mix well. This is the stuffing.

For Tomatoes

1. Cut the tops of the tomatoes in circle to remove it as a cap. Carefully remove all the pulp. I use a combination of knife and a sharp spoon to scoop everything out. The pulp that you remove can be used instead of Tomato sauce later on.

2. Stuff them with the stuffing made earlier. You can cover them with their caps and make them whole. I normally stuff tightly and then cut them in half so serving is easy.

3. Heat oil in a pan, add jeera and let it splutter. Saute onions till transluscent.

4. Add turmeric, amchur and garam masala. Fry for 30-40 sec.

5. Add Tomato Sauce (pulp from tomatoes) and 2 tblsp water.

6. Put the stuffed tomatoes carefully in the pan and roll them a little to coat with the masala prepared.

7. Transfer the stuffed tomatoes to an oven-safe baking dish and bake at 375 F for about 10-15 min till the tomato softens. When baking cover the dish with an aluminium foil so that the heat remains instead and they cook faster.

Stuffed Bell Pepper / Capsicum / Bharwan Shimla Mirch


Capsicum / Bell Peppers / Shimla Mirch stuffing has a lot of options - potatoes, besan, paneer etc. I love paneer, so I use that almost always. You can try new stuffings based on your liking.

Ingredients:

2-3 Green Pepper / Capsicum
1 tsp Jeera
1 Onion, chopped fine
1/2 tsp Turmeric
1/2 tsp Amchur / Dry Mango powder
1/2 tsp Garam Masala
4 tblsp Tomato Sauce
Salt to taste

For Stuffing
1 tsp Jeera
1 tsp Dhaniya Powder
2 tsp Sof / Fennel Powder
1 tsp Amchur / Dry Mango powder
1 tsp Garam Masala
2 tsp Roasted Besan / Gram Flour
2-3 medium Potatoes, boiled and mashed coarsly
1 cup Paneer, grated Salt to taste

Method:

Make Stuffing

1. Heat oil in a pan, add jeera and let it splutter. Saute onions till transluscent.

2. Add dhaniya powder, sof, amchur, garam masala and besan. Fry till besan turns golden.

3. Add salt, potatoes and grated paneer. Mix well. This is the stuffing.

For Peppers

1. Cut the tops of the peppers in circle to remove it as a cap. Remove any seeds from inside.

2. Stuff them with the stuffing made earlier. You can cover them with their caps and make them whole. I normally stuff tightly and then cut them in half so serving is easy.

3. Heat oil in a pan, add jeera and let it splutter. Saute onions till transluscent.

PreStuffedCapsicum
4. Add turmeric, amchur and garam masala. Fry for 30-40 sec.

5. Add Tomato Sauce and 2 tblsp water.

6. Put the stuffed peppers carefully in the pan and roll them a little to coat with the masala prepared.

7. Transfer the stuffed peppers to a bowl that will fit inside a pressure cooker. Put this inside the cooker and cover with a lid. Pressure cook for 5-7 min on slow.

or

7. You can transfer the stuffed peppers to an oven-safe baking dish and bake at 375 F for about 40-50 min till the pepper softens. When baking cover the dish with an aluminium foil so that the heat remains instead and they cook faster.

Tips

• If you don't want to pressure cook, you can cook in the pan itself on heat. But you need to keep turning the peppers so that they cook evenly.

• Whenever I make Stuffed peppers, I add a couple of Stuffed tomatoes along with them as it adds color. The stuffing is the same. Bake them to ensure that the tomatoes don't get mushy.

Tomato Ketchup


Back in India, my mom always made tomato ketchup at home. She always made 10-15 bottles which lasted us the whole year. We used to eat it as a side to everything. After my wedding, my mom started making it for me too and I never had to worry about it. When we came to US, I didn't have as much patience and I started to buy ketchup but will always miss my mom's ketchup. I am posting my mom's recipe here so I don't misplace it and it will be there in case I decide to make it some day. :)


Ingredients:

10 kg Ripe Red tomatoes
700 gm sugar
200 gm salt
50 gm Garlic
100 gm jeera / cumin seeds
20 gm Red Chilli powder
8 - 10 Badi Elaichii powder
250 gm Ginger, grated
250 gm onions, peeled and grated
30 gm Black pepper, powdered
15-16 laung, powdered
3 tsp Glacial Acetic Acid
1 tsp Sodium Benzoate


Method:

  1. Wash tomatoes and wipe dry.
  2. Grind tomatoes, onion, garlic and ginger to a fine paste. Pass it thru a sieve to remove any seeds.
  3. Start boiling this paste in a heavy-bottomed pan along with 1/2 the sugar. Keep stirring in between. It should not stick to the bottom.
  4. When it reduces to almost half in quantity, add salt, jeera/cumin powder, chili powder, elachii powder, black pepper, laung and all powdered spices.
  5. When it becomes a little more thick, add the rest of the sugar.
  6. Take a little ketchup on a plate and slant the plate. If no water separates and flows away - this is an indication that its done. Switch off heat.
  7. Take a little ketchup in a bowl and add glacial acetic acid and sodium benzote and mix well. Mix this with the rest of the ketchup well.
  8. Pour into clean bottles using a funnel. Cork tightly. Remember to put the bottles on wooden counter when pouring hot ketchup or else hot ketchup can break the bottle. If you want, pour a little wax on the sides of the cork to seal it completely.

Onion Chutney


Its been a long time since I posted something. From when I am at home since my last project, I have gotten very lazy. :) Finally today I decided that I need to post. So here I am with a very different kind of chutney which goes very well with paranthas.


Total Time: 10-15 min
Serves: 4-5

Ingredients:

1 kachhi kari / raw mago - peeled and cut
1 onion, chopped
1 tsp Red Chilli powder
salt to taste


Method:

Grind all the above ingredients to a fine paste. This goes well with paranthas.

Jal Jeera


I have been posting a lot of drinks since...you know its summer...and you need to drink a lot... :)


Total Time: 20 - 30 min
Serves: 3-4

Ingredients:

1 raw mango
1/2 tsp black salt
1/2 tsp roasted jeera / cumin powder
8 - 10 Pudina / Mint leaves
1 tsp Lavan-Bhasker Churan
2 glass water, adjust according to consistency


Method:

  1. Boil mango, peel, remove pulp and strain.
  2. Mix all the above ingredients, chill and serve.

Pake aam Ka Panna - Ripe Mango Drink


Summer is the season for mangoes. There are so many ways you can eat it - peel it and eat, make a shake, ice-cream, panna etc. Panna is what I have here for you today - last week I posted making panna using raw mango, today its using ripe mango. Both have a different taste and are very easy to make.


Total Time: 15-20 min
Serves: 2-3

Ingredients:

1 ripe mango
1 tblsp sugar
1 cup milk


Method:

  1. Remove pulp of mango and churn in a mixer. Strain it if the mango you are using has a lot of strands.
  2. Mix all the ingredients. Cool and serve. Add more milk if you want to thin. You can also adjust sugar according to taste

Kacche Aam Ka Panna


Summer's here and its the season of mangoes. It is also the season of heat. This panna has a cooling effect on the body. So you can avoid getting a sunstroke by drinking this everyday. My mom used to make it almost everyday during summers.


Total Time: 20-25 min
Serves: 2-3

Ingredients:

1 Kachha (raw) mango
1 tblsp sugar
1 tsp roasted cumin powder
1/4 tsp black salk / rock salt
1/2 tsp salt
1 tsp dhaniya powder / cilantro powder
1/4 tsp red chilli powder
1 1/2 cup water


Method:

  1. Boil mango, remove the outer peel and strain it so that you don't have any strands in there. Some people like me don't like strands. :)
  2. Add the rest of the ingredients and mix well.
  3. Decorate with a pudina / mint leaf before serving. It tastes good when chilled.

Icecream


Summer's here!!! Its that time of the year when you are always looking in the freezer to check if there are any sweet treats in that upper compartment there. Well!! Stock up with icecream.

You get a variety of flavors in the store but home-made ice-cream has its own yummy taste. The recipe given here is by my mom whose icecream has been appreciated by all in India. All guests want to know "Which brand is this?" and my mom says "Home-made". "WOW" is what you hear.

This method uses a icecream basic to which you can add whatever flavor you want.


Ingredients:

1/2 lt whole milk(a little more than 2 cups)
4 tsp GMS powder (Glycerol Mono Sterate - softener)
1/4 tsp CMC powder (carboxymethyl cellulose - prevents ice crystal formation)
2 tblsp milk powder
6 tblsp sugar


Method:

  1. Mix all the above till completely blended.
  2. Bring to a boil in a pan. Keep stirring. Boil for 2-3 min and remove.
  3. Stir continuously till it cools.
  4. Freeze till it gets harder.
  5. Remove from freezer and add one of the following to get the flavor you want. Mix well with a hand mixer. It will get softer as you mix. Refreeze and serve.

  • Chocolate - When making basic icecream, add 1 tblsp Chocolate powder, 2 tsp Cocoa powder or 35 gms Chocolate.
  • Vanilla - Add 100gm cream and 2 tsp Vanilla essence to the freezed basic icecream.
  • Pineapple - Add 1 tsp choppped pineapple pieces and 1 tsp Pineapple essence to the freezed basic icecream.
  • Orange - Add 100gm cream, 1 tsp Orange essence and 1 tsp Orange food color to the freezed basic icecream.
  • Butter Scotch - Add 100gm cream, 1/2 tsp Butter Scotch essence and 1 tsp yellow color to the freezed basic icecream.
  • Strawberry - Add 100gm cream, 3 tblsp crushed strawberry and 1/2 tsp Strawberry color to the freezed basic icecream. You can substiture strawberry with strawberry essence.
  • Mango - Make mango pulp by heating 1 cup chopped mango pieces and 1 tblsp sugar in a pan. When all water evaporates, cool and puree. Add 100gm cream, prepared mango pulp, 1/2 tsp Mango essence and 1 tsp yellow color to the freezed basic icecream.
  • Roasted Almonds - Add 100gm cream, 2 tblsp Almond paste and 1 tsp yellow color to the freezed basic icecream. Add 50 gm finely chopped almonds in the final churn.
  • Kesar Pista - Add 100gm cream, 7-8 Saffron strands and 1 tsp yellow color to the freezed basic icecream. Add 50 gms chopped pistachios in the final churn.
  • Anjeer / Fig - Soak 10-12 Anjeer in water for 7-8 hours and then mix in mixie. Add 100gm cream and Anjeer paste to the freezed basic icecream.
  • Black Currant - Add 100gm cream, 1/2 tsp Black Currant or Mixed fruit essence and 1 tsp purple color to the freezed basic icecream. Add black kismis and finely chopped black grapes in the final churn.
  • Cheeku / Sapodilla - Make Cheeku pulp by boiling 1 cup chopped cheeku with 1 tblsp sugar till all water evaporates. Mix in mixie. Add Cheeku pulp, 100gm cream and 1/2 tsp Mixed fruit essence to the freezed basic icecream. You can use other fruits in the same manner.
  • Kasata - Take a freezing pan and layer vanilla cake or bread pieces at the bottom. Add chopped dry fruits like pista, almonds, cashews on top of this. Top this with Vanilla icecream. Freeze for 1 hr. Add chocolate icecream layer. Freeeze for 1-2 hrs. Top it with strawberry icecream layer and freeze. Cut into slices when serving.
  • Chocobar - Freeze vanilla icecream in bar molds. Take 1 tblsp butter and 50 gms chocolate in a small pan. Put this in a bigger pan of hot water to liquify. Take out the frozen icecream bars and dip them in this chocolate syrup. Tightly wrap the bar in butter paper and freeze.
  • Pista - Add 100gm cream, 1/2 tsp Pista essence and 1/2 tsp green color to the freezed basic icecream.

Palak Paneer


Palak Paneer is an all time favorite, healthy dish. You can make it for parties or any day at home. When making at home, I don't use cream.

PalakPaneer


Preparation Time: 10 min
Cooking Time: 30 min
Serves: 2-3

Ingredients:

1/2 kg Spinach
100 gms Paneer, cut into 1-inch cubes
1 medium Onion
6 cloves Garlic (I use 1/2 tsp Garlic paste)
2 inch Ginger (I use 1/2 tsp Ginger paste)
2-3 tsp Green chillies (to taste)
2 medium tomatoes
1/2 cup Fresh Cream
1 tsp Cumin seeds
Salt to taste
1 tsp Garam Masala Powder
Vegetable oil as required


Method:

  1. Pressure cook spinach for about 7-8 minutes (just before the first whistle). Drain and grind to a fine paste. I microwave it.
  2. Grind together onion, ginger, garlic, green chillies to a fine paste.
  3. Grind tomato to a fine paste.
  4. Heat 1 tbsp oil in a pan and add paneer blocks. Fry these pieces on both sides till they turn golden, and place them in a bowl of water while you prepare the gravy. I normally don't fry the paneer and use them as is.
  5. Heat 2 tblsp oil. Saute onion paste till transluscent.
  6. Add salt and garam masala. Stir well.
  7. Add tomato puree and cook well.
  8. Add paneer and cooked ground spinach. Mix well.
  9. Decorate with fresh cream and serve.

Baingan Ka Bharta


Well!!! Who likes baingan???? Not me!!! :)))

I never liked baingan but this is the first dish I tried, and liked, and decided to give baingan one more chance, and I am glad I did. I am not saying that there are not many other tasty dishes using baingan, but for me this was the one that developed my taste for baingan. :)


BaiganKaBharta


Preparation Time: 10 min
Cooking Time: 30 min
Serves: 2-3

Ingredients:

1 big Baingan / Eggplant
1 onion paste
1 tomato, pureed
1 inch ginger, chopped fine
1 tsp Jeera / cumin seeds
1/2 tsp turmeric
1/2 tsp red chilli powder
1/4 tsp garam masala
salt to taste
1 tblsp oil
chopped dhaniya / cilantro, for garnish


Method:

  1. Roast eggplant over direct flame, rotating in between to ensure the eggplant gets charred evenly. The skin turns black. This gives it a nice smoky flavor. I broil it on high in an oven for about 20 min, turning once in between to char both sides.
  2. Let it cool a bit and then remove the charred skin. Mash the inside contents well. Keep aside.
  3. Heat oil in a pan and add cumin seeds and ginger and let it crackle.
  4. Saute onions till transluscent.
  5. Add turmeric, red chilli powder and salt. Fry for another 30 sec.
  6. Add tomatoes and fry well.
  7. Add mashed eggplant and garam masala. Cook for another 5 min mixing well to blend it with the masala.
  8. Garnish with cilantro. Serve with roti.

Tips

  • Add Pav Bhaji masala instead of garam masala for a different flavor and this can be eaten as bhaji along with pav.

Cheela / Pesarattu


Making this is very easy and its a healthy one too. I call it "green dosa" for my daughters who like dosas ;) .... My daughters do love these dosas although they prefere it topped with grated cheese and not paneer which I am ok with.

We in north India call it Cheela and eat it with dahi (with salt, red chilli powder and roasted cumin powder). When we came to south India, I came to know a new name for it - pesarattu. So Cheela or Pesarattu .... whatever .... its a great breakfast or lunch or dinner.

Plus...any leftovers can be used to make "mangodi". Add finely chopped onions to the batter and deep fry small balls in oil. Serve with Imli Chutney.


Cheela


Preparation Time: 15-20 min (not including overnight soaking)
Cooking Time: 20-30 min
Serves: 2-3

Ingredients:

1 cup Split Moong dal, soaked overnight
2-3 green chilli
2-inch ginger
salt to taste

finely chopped onion / grated paneer for topping


Method:

1. Grind all the ingredients to a paste. Add water if its too thick. It has to be of dosa consistency.

2. Spread it on a hot griddle. Take a big scoop of mixture, place it in the center of the pan and spread it in a circular fashion on the whole pan.

3. Sprinkle chopped onions / paneer on top. Let it cook for 2-3 min till you can see it lightly browning.

4. Remove carefully and serve with Yoghurt / Chutney.

Shahi Rabdi


Making Rabdi has never been easy. I never made rabdi at home. But after I got this recipe from another recipe book, I did make and was truly amazed by its results. And its so quick. "Microwave is an amazing invention."


Preparation Time: 5 min
Cooking Time: 6 min
Serves: 4

Ingredients:

1 cup milk
1/2 cup condensed milk
1 cup grated paneer / cottage cheese
1/4 tsp elaichii / cardamom powder
2-3 strands of saffron - optional


Method:

Mix all the ingredients in a microwave safe bowl and microwave on high for 6 min. Take a wide deep bowl ensuring only 1/4 of the bowl is full or the milk will spill in the microwave.

Layered Mexican Dip


We have all eaten doritos and tortillas with salsa. This creates a very nice variation of the dip and it is super easy to make. Plus any leftovers can be used the next day for a quick Taco lunch or any other Mexican dish.

LayeredMexicanDip


Total Time: 30 min
Makes 1 medium bowl

Ingredients:

2 tsp taco seasoning mix
1 can refried beans
1/2 cup cream cheese, softened
1 cup sour cream
1-2 guacamole, mashed thoroughly
1 cup tomatoes, green peppers and onions, chopped fine
1 jar salsa
1 cup shredded cheddar cheese
Black olives/Black beans - for garnish - optional


Method:

Layer in the following order and microwave for 1 min till cheese melts.

  1. Layer 1 - Refriend beans mixed with taco seasoning
  2. Layer 2 - Sour cream mixed with cream cheese
  3. Layer 3 - Guacamole
  4. Layer 4 - Tomatoes, green peppers, onion mixture
  5. Layer 5 - Salsa
  6. Layer 6 - Cheddar cheese
  7. Layer 7 - Garnish with your choice of black olives / black beans. (optional)

Pav Bhaji


PavBhaji


Total Time: 40-50 min
Serves: 5-6

Ingredients:

For Bhaji
5 big Potatoes, chopped into 1-inch pieces
5 medium onions, chopped ( 1 1/2 for boiling, 1/2 for seasoning and 3 for decoration)
5 medium Tomatoes
2 large Carrots, chopped
12-15 beans, chopped
1 Cauliflower, chopped
1 cup green peas
1/2 cup Dhaniya Leaves, chopped fine
1 tsp oil
1/2 tsp Turmeric
2 1/2 tsp Pav Bhaji Masala
2 lemon juice

Pav / Buns to eat the bhaji with


Method:

Bhaji

1. Pressure cook all vegetables along with salt and turmeric. Tomatoes need not be cut. They can be placed whole. The boiling has to be longer, about 30-35 min.

2. Heat oil in a pan, saute 1/2 chopped onion till transluscent.

3. Remove the peel of the boiled tomatoes and add it to the pan. Mash properly.

4. Add rest of the boiled vegetables and mash properly.

5. Add water (according to consistency) and let it boil.

6. Add dhaniya leaves, pav bhaju masala and lemon juice.

Pav

1. Split each pav into 2 pieces. Apply butter on the inner side of each pav.

2. Place them on a heated flat-bottomed pan and fry both sides till lightly brown.

3. Serve with Bhaji.

Chocolate Chip Cookies


The smell of cookies baking is something not to be missed. I never baked cookies at home. We always bought them from the store. Recently I went into this baking spree and wanted to try everything that can be baked. This was one of my initial things to try and tasting the way they turned out, I have been baking cookies at home ever since. They are nothing when compared to the store bought ones. You have to try out to know the difference.

ChocolateChipCookies


Total Time: 30-40 min (including baking time)
Makes: 5 dozen cookies

Ingredients:

3/4 cup light brown sugar, firmly packed
3/4 cup granulated sugar
1 cup / 2 sticks butter, softened
1 tsp vanilla extract
2 large eggs
1/2 tsp salt
1 tsp baking soda
2 1/4 cups All-Purpose Flour
2 cups semisweet chocolate chips (I use 1 cup as we don't prefer so may chips)

Method:

  1. Preheat the oven to 375°F. Lightly grease (or line with parchment) two baking sheets.
  2. In a large bowl/stand-mixer, mix together both sugars, butter, and vanilla extract, beating until smooth and creamy.
  3. Add eggs one at a time beating in-between. Beat for 1-2 min.
  4. Mix in the flour, baking soda and salt slowly, beating continuously. Finally mix in the chips.
  5. Use a spoon to scoop 1 1/4" balls of dough onto the prepared baking sheets, leaving 2" between them on all sides; they'll spread.
  6. Bake the cookies on top rack of your oven for 10 to 11 minutes, till their edges are chestnut brown and their tops are light golden brown. If you want them chewy and soft - bake for 10 min and if you want them crispy - bake for 11-12 min. Remove them from the oven, and cool on the pan till they've set enough to move without breaking. Repeat with the remaining dough.

Tips

When I started making cookies I always got my cookies burnt. I tried it 2-3 times and they would always burn. If I cook for lesser time, the tops were not cooked completely and when cooked for the specified time, the bottoms were burnt. Then I came across these airbake cookie sheets by WearEver which I tried and was amazed by the way they cooked. No more burnt cookies.

Here's a link to where it can be bought from. There are various sizes available but I like these 20-inch ones as they fit my oven completely avoiding any space wastage.

Quesadillas


Whenever I go to Uno's here in the US, I always order their Farmers Market Deep Dish Pizza....I know...I know...its full of calories....but then I don't go to Uno's so often.....maybe once in 6 months. So I guess its OK. Anyways, this time when we went there I wanted to try something different and so I ordered Roasted Vegetable Quesadilla. I liked it a lot and decided that I have to try and make it at home because well....you know...Home cooking is healthier...:-)

Then I came across Ashlee's recipe and decided that I had to cook these. I made slight modifications to it. So here I was trying out this recipe. And it turned out amazing. Even my daughter ate all of it.

I like to use multi-colored peppers to give more colors, but the day I made these I had only green peppers in my fridge - so I used only those. Thats why the vegetable filling looks so green.


Quesadillas


Preparation Time: 15 min
Cooking Time: 15 min
Serves: 4

Ingredients:

4 tortillas of choice - flour or wheat

Vegetable Filling
1 onion, chopped fine
1 red bell pepper
1 yellow bell pepper
1 cup frozen/baby spinach
1 tblsp Olive oil
salt to taste
black pepper to taste
1/2 tsp garlic powder

Cheese Spread
10-12 pieces sundried tomtaoes, reconstituted (Put them in hot water for 10 min)
1/2 cup tofu, chopped
1/2 cup cheese of choice - mozarella, cheddar, parmesan
3-4 garlic cloves, peeled and chopped
Salt to taste
black pepper to taste


Method:

  1. Saute onions in a olive oil till transluscent.
  2. Add the rest of the vegetables and stir-fry till soft and completely dry of water.
  3. Add salt and pepper.
  4. Pulse all the ingredients under spread to a crumpled mixture.
  5. Heat a griddle. Spray oil on a tortilla and place it on the hot griddle. Let it cook lightly on one side - about 30-40 sec. Flip it over and cook the other side till you can see small bubbles forming. Now sprinkle a little cheese on one half. Put 2-3 tblsp of vegetable filling on top of this. Top it with 1-2 tblsp cheese spread. If you like sprinkle a little more cheese on top of this. Cover this with the other half of the tortilla. Cook both sides till slightly crisp and brown.
  6. Cut into 3 traingles (like a pizza slice) and serve hot with sour cream.
QuesadillasProcess


Tips

  • You can add whatever vegetables you like.

Cooking Rice in a Microwave


When I came to US, one of the things I saw is the variety of gadgets they have in stores here for microwave cooking - omelette maker, egg boiler, rice cooker etc. Since I don't cook eggs as much, I bought a microwave rice cooker. When I first used it, I was amazed with its ease. And the quality of rice that came out of it was equivalent to that of an electric rice cooker. You don't have to keep a watch on the rice cooking on the stove or keep an ear open for the pressure cooker whistle to go off. Just set the time and you are done. A perfect bowl of rice is ready.

When I started blogging, I realised that many readers (esp people in India) wouldn't have a microwave rice cooker. So I tried to make rice using a microwave safe bowl - and voila, the results were the same with the same ease. So here is my way of cooking rice in the microwave.

One thing to note is that the wattage of your microwave might make a difference in the time required. I have a 1300W microwave, but I decrease its power level to 7 when making rice.


Total Time: 10-25 min (depending on quantity of rice)

Ingredients:

Rice - as per how much you want to make
Water - double the rice + a little more

Here are my proportions
1/2 cup rice with 1 cup + 2 tblsp water
1 cup rice with 2 1/4 cup water
1 1/2 cup rice with 3 1/2 cups water
and so on ...


Method:

  1. Take a microwave safe bowl. Rice expands on cooking. So take a bowl large enough for rice and water plus have a little extra space for boiling and expanding.
  2. Wash rice a couple of times. Add water. Some like to soak rice for sometime before cooking. I usually am in a hurry, so never do it.
  3. Microwave on power 7 (based on my microwave of 1300W). The time is based on the amount of rice. The times I use are

         1/2 cup rice -------- 8 min
         1 cup rice -------- 10 min
         1 1/2 cups rice -------- 15 min
         2 cups rice -------- 20 min

  4. Once the microwave is done, let the rice remain in for about 4-5 min before digging in. This resting period cooks the rice to its best.
  5. All done - Serve

Tips

  • During boiling there might be a little water spillage in the microwave if the bowl used is smaller. This is OK.
  • Left-over rice in the fridge often looses moisture and becomes hard. Add about 1/2 cup water and microwave 4-5 min. It will be soft again.
  • The microwave cooker that I use is shown below.


Microwave Besan Laddu


Well....We have all made these using the regular kadai/wok. But making it in a microwave was a completely different experience.

MicrowaveBesanLaddu


Total Time: 30 min (includes cooling time)
Makes 12 pcs

Ingredients:

1 cup besan/gram flour
3/4 cup sugar - powdered if its big grained one
1/4 cup ghee
1/4 tsp elaichii powder
1/4 cup raisens, cashews, almonds - optional


Method:

  1. Mix ghee and besan in a microwave safe bowl. Try to break as many lumps as you can.
  2. Microwave for 1 min. Take it out and mix well. It will be very easy to break all the lumps now.
  3. Microwave for 5 more minutes stirring after every min. Time might vary depending on microwave wattage. The one I used is 1300W and it took me 6 min for the besan to be cooked. Be around the microwave and keep checking. When the besan has changed color and gives a nice aroma - thats an indication that its done.
  4. Cool it completely. Add sugar, elaichii, raisins and chashews. Mix well.
  5. Make small balls like laddu's with your hand. If the mixture has gotten too dry and not holding together add a little melted ghee.
MicrowaveBesanLadduProcess


Spicy Dum Alu


We had a potluck once at my work back in India. This colleague. Nilesh got Dum Alu's made by his sister and they were an instant hit. I was not much into cooking those days but took the recipe. This sheet has been with me for all these years. Recently when we had a get together at a friend's house here, I thought of finally trying this out. I seem to have forgotton the taste of what I had, but this turned out good too. I made a few changes to the original based on my experience.

SpicyDumAlu


Total Time: 50-60 min
Serves: 4-5

Ingredients:

8-10 baby potatoes
1 tsp Amchur / dry mango powder
1 tblsp tandoori masala
4 tblsp oil
Salt to taste
1/2 cup water
1/2 cup milk
1/2 cup dhaniya/cilantro leaves, chopped for garnishing

Onion paste
2 onions, chopped into 4
2 tblsp cashew nuts
2 badi elaichii
1" ginger or 1 tsp ginger paste
5-6 garlic cloves or 1 tsp garlic paste
2-3 green chilies
1/2 cup grated coconut
2 tblsp dhaniya powder
1 tsp red chili powder
1 tsp cumin seeds
1 tsp turmeric
1/2 tsp garam masala
2 tblsp poppy seeds - optional
1 tsp Kasurimethi / fenugreek leaves - optional


Method:

  1. Take onion, cashews and elaichii in a microwave-safe bowl along with 1/2 cup water. Microwave for 5 min. You can also boil in a pan on gas-stove. Cool and grind with all the ingredients under Onion paste to a smooth paste.
  2. Boil baby potatoes. Peel and let it cool so that they harden a little. This is to ensure they don't break when you make holes in them. Once cooled take a toothpick and make holes in the potatoes. This is so the gravy seeps in the potatoes. If you like you can shallow fry these potatoes - I normally don't do that.
  3. Heat oil in a pan and fry the onion paste till it gives out a nice aroma. Do not hurry. Cook on medium-high heat.
  4. Add milk, water and salt. You can increase these amounts based on the consistency of the gravy you want. Simmer and let it boil for 5-6 min.
  5. Add potatoes, amchur and tandoori masala. Let it cook on slow heat for about 8-10 min.
  6. Garnish with dhaniya leaves and serve.
SpicyDumAluProcess


Tips

  • If you don't have baby potatoes, take normal potatoes and cut them into smaller sizes.

Kala Chana


I have never made Kala Chana. I have eaten it many times in temples with grated coconut and always liked it a lot but somehow never got to making it. Yesterday being Ashtami, I made puri, halwa and Kala Chana to go with it - not the one with coconut but spicy Kala Chana with gravy. This can go with dry Indian breads or rice.

KalaChana


Preparation Time: 15 min (not including the soaking time)
Cooking Time: 40-45 min (includes 20-25 min of pressure cook)
Serves: 2-3

Ingredients:

1 cup Kala Chana, soaked for 3-4 hours
1 large onion, chopped fine
1 tsp ginger paste
1 tsp garlic paste
1 tsp jeera / cumin seeds
2 large tomatoes, pureed
1 tsp Garam masala
Salt to taste
1 tblsp oil


Method:

  1. Pressure cook soaked kala chana with 4 cups water for about 20-25 min on slow heat till soft.
  2. Heat oil in a pan. Add jeera and let it sparkle. Saute onions till transluscent. When the onions are almost done, add ginger and garlic paste.
  3. Add pureed tomatoes and cook till oil separates.
  4. Add boiled Kala Chana. Don't add the extra water in the chana. Keep it aside.
  5. Let it boil for 2-3 min. Add garam masala and boil for another 2-3 min.
  6. Add left-over water of the chana, based on the consistency required.
  7. Serve with roti/puri/rice.

Rava / Suji Halwa


It was Ashtami yesterday and so I had to make this along with Puri and Kala Chana.

Suji Halwa is often made on religious occasions as prasad (offering to God). Its very easy to make and tasty to eat. I make it often when I have a sweet craving and there's no sweet around. :-)


SujiHalwa


Total Time: 10-15 min
Serves: 4

Ingredients:

1 cup rava
1 cup sugar
2 tblsp ghee
2 1/2 cup water
1/4 cup grated coconut, Almonds and Cashews (optional)


Method:

  1. Heat ghee in a pan and fry rava till golden.
  2. Add water and let it boil.
  3. When it thickens add sugar. It will liquify again. Let it boil to solidify to desired consistency.
  4. Decorate with grated coconut, Almonds and Cashews.

Pineapple Raita


Pineapple is one of those fruits that is delicious to eat. In addition to being delicious, it has a lot of healthy benefits tagged to it. So if you get a recipe loaded with healthy ingredients, its always a hit. And so was my mom's Pineapple Raita.

My mom learnt this from one of the TV Food Shows and tried it out at a party and it was an instant hit. No-one had eaten it before. Initially I didn't like it much as it is not salty like the regular raita you eat; but is sweet and salty - a very distinguishing flavor, which I like now.

This is a great twist to the regular raita. Try it out and decide by yourself.


PineappleRaita


Preparation Time: 5-10 min
Cooking Time: 5-10 min
Serves: 5-6

Ingredients:

1 can pineapple or 1 cup fresh pineapple
2 cups dahi / yoghurt
1-2 tsp sugar or 3/4 cup sugar if using fresh pineapple
salt to taste
1 tsp roasted jeera/cumin powder
black pepper to taste


Method

  1. If using fresh pineapple, heat fresh cut pieces of pineapple in a wok/pan till it is half boiled - it gets all soggy. Add 3/4 cup sugar and keep stirring on low-medium heat till it becomes like syrup. Cool completely. You can use it immediately or store it in an jar in your fridge; ready to use when required.
  2. Take dahi/yoghurt in a bowl. Add sugar, jeera powder, black pepper and salt and whisk well till smooth. Remember salt should be added just before setting it on the table. Adding salt before hand in any raita will make dahi sour/khatta.
  3. Add pineapple pieces. Mix well and serve.
  4. Pineapple raita goes well with spicy rices like biryani.

Sending this off to Waiter there's something in my ... Pineapple being hosted by Andrew of SpittoonExtra

Lauki Ke Kofte


This is a dish which is very popular with kids as it contains deep fried pakoras. The fact that these pakoras are made of Lauki and hence healthy is good for moms to know and make this.

LaukiKofta


Preparation Time: 30 min
Cooking Time: 15 min
Serves: 4-5, makes about 20 Kofte

Ingredients:

1/2 Lauki / Bottlegourd or 2 cups grated lauki with water removed
3 tblsp Besan / Gram flour
1 large onion, ground to a paste
2 medium tomatoes, ground to a paste
1 tsp jeera / cumin seeds
1/2 tsp haldi / turmeric
1 tsp dhaniya / cilantro powder
1 tsp ginger-garlic paste
salt to taste
oil for deep frying


Method:

  1. Grate lauki. Take it in your hand in big chunks and press tightly to remove as much water as you can.
  2. Add besan to this and mix well. Make balls out of this and deep fry them in low-medium heat. Be very gentle when frying. Turn then only when you see them slightly golden on the sides. Remove when completely golden-brown.
LaukiKofta1


  1. Heat 1 tblsp oil in a pan. Add jeera and let it splutter. Saute onions till transluscent.
  2. Add ginger-garlic paste, turmeric and dhaniya and fry for 30-40 sec.
  3. Add tomato puree and salt and let it cook till oil separates from the tomatoes.
  4. Add 3 cups water to make a thin gravy. Add koftas and let it boil for 1 min. Do not stir it too much now or the koftas will break. This curry needs more water as the water gets absorbed in the koftas.
  5. Serve with rotis.

Tips

  • Besan has to be just enough for binding and to ensure that the koftas don't disintegrate when frying. If the amount of water left out in your grated lauki is more, then you will need more besan. Ideally first fry only one kofta to see how it is. If is holds well then fry all or add more besan to it. If you add too much besan, koftas are going to be hard.

Garam Masala


Garam Masala is used in most North Indian dishes. "Garam" which literally means "hot" is a part of the name as this bleand uses spices which, according to Ayurveda, are considered warming like cloves, pepper, cinnamon. Different people in different parts make this by adding different spices. Here's a recipe that I got from my mom. She makes the exact proportions mentioned below and stores it in an air-tight container.

Note that Garam Masala should be used in very small quantities in food as too much can overpower the dish. Always add this to your dish right at the end of cooking.


GaramMasala


Time: 20 min
Makes about 560 gms

Ingredients:

100 gm Laung / Cloves
100 gm Kali Mirch / Black peppercorns
100 gm Badi Elaichii / Black Cardomom
50 gm Chotti Elaichii / Green Cardomom
50 gm Sonth / Dry Ginger
50 gm Tej Patta
25 gm Nutmeg
25 gm DalChini / Cinnamon Sticks
50 gm Shahjeera
10 gm Javitri / Mace


Method:

Sun dry all the above or roast them for a few minutes. Grind to a fine powder. Store in an air-tight jar.

Simple Vanilla Cake


Nothing like eating this plain, old Vanilla Cake. I made it yesterday after a long time of eating various other flavors. And this reminded me of the times I made cake as a kid with my mom. We didn't have any electric mixers - so I used to mix by hand. After every couple of minutes, I would ask my mom "Ho gaya kya? (Is it done?)", and my mom would come, see the softness and tell me to go on. Wow!!! Thinking about it now, I wonder how I did it and I think Technology is great:)

You can top this with any frosting of your choice - chocolate, strawberry, coconut, caramel - and a full fledged party cake is ready with no fuss. You can make layers with frosting in-between.


VanillaCake1


Preparation Time: 15-20 min
Waiting Time: 35-40 min
Makes: 1 9 X 13-inch cake or 2 8-inch rounds

Ingredients:

2 cups Maida / All purpose flour
1 1/2 tsp Baking Powder
a pinch of salt
3/4 cup Butter, softened
6 eggs
1 1/2 cups Sugar
2 tsp Vanilla Essense


Method:

  1. Mix flour, baking powder and salt well.
  2. Beat sugar and butter in a deep bowl till soft. Scrape bowl to beat everything properly. In a stand mixer, this takes about 3-4 min on medium speed.
  3. Add eggs one at a time beating continuously. After adding the final egg, beat for about 2-3 min.
  4. Add flour-baking powder-salt mixture to this slowly beating continuously.
  5. Add Vanilla essence.
  6. Pour the contents to a greased 9" by 13" baking dish.
  7. Bake at 350 F on center rack for about 35-40 min. A toothpick inserted in the cake should come out clean.
Thats my cake all ready to be eaten.

VanillaCake2


Carrot and Spinach Rice


When I first read this recipe in one of my recipe books, I didn't think too much of it. My husband likes to take "spoon-foods" to work. So its mostly rice. I always run short of ideas on what kind of rice to make as we are not regular rice-eaters. So I gave this recipe a shot - and it turned out just amazing - so different from any other rice that I have eaten.

CarrotSpinachRice


Preparation Time: 10-15 min
Cooking Time: 10-15 min
Serves: 4

Ingredients:

2 cups cooked Rice
1/2 tsp Jeera
2 Onions, sliced
2 Garlic cloves, chopped
2/3 cup grated Carrot
2 cups chopped Spinach
1 tblsp Oil / Ghee
Salt to taste
Black Pepper to taste


Method:

  1. Heat oil / ghee in a pan and add Jeera. When it crackles, add onions and garlic and saute for 3 min.
  2. Add carrots, spinach and saute for another minute.
  3. Add rice, salt, pepper and 1/4 cup water and mix well.
  4. Simmer and cook for 5-7 min till the moisture evaporates.
  5. Serve hot.

Singhare ki Puri


This special puri is made especially during pujas that require fasting. Many Indian fasts require the use of special flours, fruits, and spices. Many commonly used cooking ingredients are not allowed during fasts. Singhare ka atta or Waterchestnut flour is usually a "vrat" or a fasting item.

SinghareKiPuri


Preparation Time: 10-15 min
Cooking Time: 10-15 min
Serves: 4-5

Ingredients:

2 cups Singhare Ka Atta or Waterchestnut Flour
2 medium potatoes, boiled, peeled and mashed
sendha namak / rock salt to taste
1/2 cup dhaniya/Cilantro leaves, chopped
1-2 green chillies, chopped fine - optional

Method:

  1. Knead all the above ingredients into a dough. Mix all the ingredients before you add water as potato will also aid in some binding. Add water slowly as this flour is different from regular flour and needs less water.
  2. Make small ball out of this and roll / pat them into puris.
  3. Deep fry the puris in oil / ghee till golden.
  4. Serve with Alu/Potato Curry especially made for fasting or any other curry of your preference or just with plain yoghurt and pickles.

Tips

  • Some Indian grocery stores do carry this flour.
  • You can use regular wheat flour too if you are not fasting but just carrying over the tradition.

Vrat wali Alu ki Sabzi


This potato sabzi is mostly made during pujas when many fast(vrat). During fasting most people don't eat salt, whole wheat flour, onions etc. This dish is made without these basic ingredients and still tastes yummy. So I make it at home even though I don't fast. :-)

VratKiAluSabzi


Preparation Time: 5 min
Cooking Time: 5-10 min
Serves: 2-3

Ingredients:

3 potatoes, boiled, peeled and coarsely mashed
1 tsp Ghee / oil - though ghee is preferred
2-3 green chillies, slit length-wise
sendha namak - rock salt - I use regular sea salt as I don't fast
1/2 cup dhaniya/Cilantro leaves, chopped

Method:

Heat ghee/oil in a pan. Add green chillies, salt and potatoes. Add water based on the kind of consistency you like. Add dhaniya leaves. Serve with Roti / puri. During fasts since you can't eat whole wheat flour, my mom makes puris using Singhare ka atta (Waterchestnut Flour).

Vegetarian Tacos


I loved Tacos the first time I ate them here at my cousin's house. I never got to asking her how to make them, but always wanted to make them at home. So I got the whole "Taco making kit" :-) from the store and made them as said in the recipe. They were really good, but I wanted them to be softer when you bite. So then I tried it using flour tortillas and the results wree just as I wanted them to be.

It was a big hit with my daughters too. So I make them pretty regularly these days.


Tacos


Preparation Time: 10-15 min
Cooking Time: 10-15 min
Serves: 3 (makes 6 Tacos)

Ingredients:

1 can red Kidney beans - I boil 1-2 cups kidney beans at home
1 onion, chopped
1 tomato, chopped
1 green/red pepper/capsicum, de-seeded and chopped
1 jalapeno pepper, de-seeded and chopped
1 clove garlic, minced
1/2 tsp jeera / cumin seeds
1/2 tsp red chilli powder
1 tsp dhaniya / coriander powder
salt to taste
2 tblsp oil
6 medium corn tortillas / Taco shells
4-5 tblsp of your favorite salsa

Taco Toppings
shreded cheddar cheese
shredded lettuce
salsa
fresh cilantro, chopped
tomato
black olives
sour cream

Method:

  1. If using regular red kidney beans, soak for 4-5 hours, boil till cooked and drain water.
  2. >
  3. Heat oil in a pan. Add jeera and let it crackle. Saute onions till transluscent.
  4. Add red chilli and dhaniya powder. Fry for 30 sec. Add garlic, peppers and salt and let it cook. When its almost done, add tomato and cooked beans. This is the Taco filling.
  5. When you are ready to eat, heat a griddle.
  6. Spray oil on a tortilla and place it on the hot griddle. Let it cook lightly on one side - about 30-40 sec. Flip it over and cook the other side till you can see small bubbles forming. Now sprinkle a little cheese in one half. Put 2-3 tblsp of Taco bean filling on top of the cheese. Top it with 1 tblsp salsa. If you like sprinkle a little more cheese on top of this. Cover this with the other half of the tortilla. Cook both sides till slightly crisp and brown. Top it with your choice of toppings like lettuce, cheese, olives, sour cream etc and serve hot.
  7. If using Taco Shells, fill each shell as above and bake at 300 F for 5-6 min. This makes them slightly soft so that they don't break with your first bite.
MakingTaco


Chana Dal with Lauki


This is my husband's favorite. His mom always makes it with tomato instead of lauki/bottlegourd. My mom made it with lauki and I like both styles. But I have been cooking it with lauki lately because as all of us know "Lauki is healthy" and the fact that my daughters eat less vegetables as is. In this form lauki is invisible - totally mashed and hidden in the dal. My daughters never see it and love the dal. This goes well with Rice - can be eaten with Roti too :)

ChanaDal
Preparation Time: 5 min
Waiting Time: 30 min
Cooking Time: 10 min
Serves: 5-6

Ingredients:

1 cup Chana Dal
1/2 Lauki / Bottle Gourd,chopped into 1 inch pieces
1 medium Onion, ground to a paste
1/2 tsp Turmeric
Salt to taste
1 tsp Jeera / Cumin Seeds
1 tsp Garam Masala
1 tblsp oil / Ghee

Method:

  1. Boil Chana Dal, Lauki, turmeric and salt with 3-4 cups water till soft. First put chana dal and water and then add lauki so that you can skim lauki pieces later on. If using a presure cooker, it takes about 20-25 min on slow heat.
  2. Heat oil/ghee in a pan, add jeera and let it crackle. Add Onion paste and fry for 4-5 min.
  3. Skim the lauki pieces out from the dal and add them to the pan. Mash properly.
  4. Add dal and garam masala. Adjust consistency by adding water if you want to thin the dal. Boil for 3-4 min.
  5. Serve with Rice / Roti.

Tips

  • You can use tomato puree instead of lauki. I like the taste of lauki in Chana Dal.
I had to really put on my thinking cap when I read Kids Lunches event hosted by Srivalli and created by Meeta as a regular Monthly Mingle.

[MM+KidsLunches.jpg]


Most of the time for my day-to-day cooking, I don't think "What to cook for kids today?" I just cook what I would normally and hope that the kids would eat. I make slight modifications to suit my daughters taste buds and my aim to feed veggies to them.


Tuar Dal


The reason I am blogging this very simple dal is because I came to know recently that not everyone cooks it this way. Its very common in Northern India where people (my nani's family, my dadi's family) cook it every single day. This goes well with rice and so its cooked mostly for lunch as people in North eat a little rice for lunch. Dinner usually has roti's and no rice, so there are other vegetables to go with it.

TuarDal


Preparation Time: 3-4 min
Waiting Time: 25-30 min
Cooking Time: 5 min
Serves: 3-4

Ingredients:

1 cup Tuar dal
3 cups water
1/4 tsp turmeric
salt to taste
1/2 cup dhaniya leaves

For Tempering
1 tsp Ghee
1 tsp Jeera / Cumin seeds
1/2 tsp Red Chilli powder
a pinch heeng - optional as many don't like its flavor

Method:

  1. Pressure Cook dal with water, turmerc and salt for about 20 min on slow heat.
  2. Let it cool.
  3. Take ghee in a ladel and heat it. Add hing, jeera and red chilli powder. Once it crackles, pour it on top of the dal. Keep a close watch - the tempering burns very easily.
  4. Add chopped dhaniya to the dal and serve hot with rice. Rotis also go well with it if you have another vegetable dish on the side.

Kadhi


Kadhi needs no introduction to Indian people. To every Indian this immediately gives the imagination of "Kadhi-Chawal" which is how it is eaten most often. It is popular across India. Different regions make it differently. Some make it thick, some thin. Some use Kadhi Patta, some use Dhaniya leaves.

Making it is very easy. I make it whenever I am too lazy to make anything else. There are many kinds of Kadhi - Boondi Kadhi, Pakora Kadhi, Alu Kadhi, Palak Kadhi, Vegetable Kadhi etc. In all these, the base Kadhi which is made of sour dahi (sour yoghurt) is the same. This can be eaten as is too. To this you can add boondi or pakora or alu etc.


PakoraKadhi


Preparation Time: 5-30 min - depending on type of Kadhi
Cooking Time: 5-10 min
Serves: 3-4

Ingredients:

For Kadhi
3 cups sour curd / yoghurt
1 cup water
2 tblsp besan / gram flour
1/2 tsp turmeric
1 tblsp Garlic - optional - I like the flavor of Garlic
1 tsp oil
1 tsp Rai / mustard seeds
1 tsp jeera / cumin seeds
1 tsp Red Chilli powder or 1-2 whole Red chillies

Additions

1 1/2 cup Boondi

or Pakora

or 1 1/2 cup spinach

or 3-4 potatoes

or 2-3 cups mixed vegetables(potato, tomato, broccoli, cauliflower etc)


Method:

  1. Beat curd/yoghurt, besan, turmeric, garlic and 1 cup water with a whisk/spoon till there are no lumps.
  2. Heat oil in a pan and add rai and jeera. Let it splutter for a min. To this add red chilli (powder or whole). Add the curd mixture and more water depending on the consistency you like. Let it boil for sometime - about 7-8 min.
  3. This is the base Kadhi.
  4. To this one of the following needs to be added.
Boondi Kadhi

Heat a little water in a pan and add 1 1/2 cups boondi to the hot water. Leave it for 1-2 min, drain and add to Kadhi.

Pakora Kadhi

Mix together 1 1/2 cup besan/gram flour, salt to taste, 1/2 tsp red chilli powder and 1/4 tsp Baking Soda into a smooth thick paste. Heat oil for deep frying in a pan and make small pakoras. To make pakoras, drop 1 tsp of besan paste into the pan. If the pakoras get tails, just break the tails once you take them out. Add these pakoras to the Kadhi.

Palak / Spinach Kadhi

Remove stems from a bunch of spinach, chop coarsly, put in boiling water for 2-3 min and add to Kadhi. I use 1 cup frozen Spinach as is.

Alu / Potato Kadhi

Boil 3-4 potatoes, peel and cut into bite size pieces. Add to Kadhi.

Vegetable Kadhi

Boil 2 potatoes and 1/2 broccoli. Cut into bite-size pieces. Chop 1 large tomato into bite-size pieces. Add this to the Kadhi. Adjust salt.


Tips

  • To Kadhi, you can also add Kadhi patta or dhaniya/cilantro leaves if you like.
  • While making pakoras, you can add onions and diced potatoes to the besan mixture.
  • I usually serve Potato and Vegetable Kadhi with rotis and the rest with rice.
  • When serving Kadhi with Rice, serve Papad along with it.

KadhiChawal


Atta-Dal Kachori / Bhidai


When anyone says Kachori, you imagine a crispy, khasta Kachori with filling (mostly dals-lentils). This is different kind of Kachori and a common one in Madhya Pradesh, a state of India. It is also called "Bhidai". It is very similar to puri in terms of softness, but also has dals(lentils) and spices mixed in it. Since it is soft, it serves as a main bread during meal times. It is served with thick potato gravy curry and Dhaniya chutney.

Kachori


Preparation Time: 10-15 min
Cooking Time: 15-20 min
Serves: 4-5

Ingredients:

4 cups Atta / Whole Wheat Flour
1/2 cup Moong Dal, soaked overnight
1 cup Urad Dal, soaked overnight
4 tblsp Oil
4 tsp Sof / Fennel powder
3 pinch hing
Salt to taste
Oil for deep frying

Method:

  1. Grind the dals to a fine paste using as little water as you can.
  2. Knead all the above into a hard dough. Do not use any more water. The water from the dals should be enough to knead it.
  3. Make loyi / small balls out of this dough.
  4. Roll it out into a puri and deep fry in hot oil.
  5. Serve with Alu sabzi and Dhaniya Chutney.

Ghee


Ghee is clarified butter. Without ghee any Indian sweeet is incomplete. A good quality ghee adds a lot of flavor and aroma to your food. In India, Ghee is considered to be the best cooking oil. Milk in India has a lot of cream in it which accumulates at the top of the milk and can be skimmed. My mom used to skim out this cream and save it in the fridge. When enough has been accumulated she used to make Ghee.

These days the Ghee you get in Indian stores here in the US is pretty good but I have my mom's recipe of making ghee in case you live in a country where you don't get good Ghee or just want to make at home. I am posting 2 methods here, one for when you have the skimmed cream from the milk collected and the second method when you don't have skimmed cream. Ghee can be stored on your shelf - no need to refrigerate.


Method 1 - using skimmed cream

Boil 2-3 cups cream in a heavy bottomed pan. Simmer and let it boil till it becomes clear and you can see the bottom of the pan. Keep a watch and stir regularly to avoid burning as this sticks very easily to the base. Cool and strain using a cheese cloth to avoid any solid particles to pass through. Store in a jar on your shelf.

Method 1 - using unsalted butter

Heat 8-10 sticks unsalted butter in a heavy bottomed pan till it melts. Simmer and let it boil till it becomes clear and you can see the bottom of the pan. It will become frothy and then slowly turn clear. Keep a watch and stir regularly to avoid burning as this sticks very easily to the base. Cool and strain using a cheese cloth to avoid any solid particles to pass through. Store in a jar on your shelf.

Chinese Fried Rice


The Indian style of cooking Chinese is very different from the rest of the world and hence the name Indo-Chinese. I love chinese food - maybe because of the fact that growing up in India, this was the second largest number of restaurants you would find after Indian cuisine and also because its so tasty - noodles and manchurian and spring rolls, oooohhh - I wish I could find an Indo-Chinese restaurant here in Boston now.

ChineseFriedRice


Preparation Time: 15 min
Cooking Time: 10 min
Serves: 3-4

Ingredients:

2 cups Rice, cooked and cooled
3 tblsp Oil
1 cup beans, chopped fine
2 carrots, chopped fine
1 onion, sliced fine
1/4 cabbage, chopped fine
2 spring onions, chopped fine
3 tblsp chopped celery
1" ginger, chopped fine
2 cloves garlic, chopped fine
2 tblsp soya sauce
Salt & pepper to taste

Method:

  1. Heat oil in a stir-fry pan and fry all chopped vegetables for 4-5 min. They should not be too soft, but a little firm.
  2. Add salt, pepper and rice. Mix well.
  3. Add soy sauce and fry for 1-2 min.
  4. Serve hot with manchurian.

Basic Pastes


How much ever anyone tries to convince me to make ginger - garlic pastes at home - I have always been very lazy for this. I know that store-bought bottles don't have the same flavor as home-made ones. But what the heck? Its pastes - right? I'll use more of it each time to get the right flavor. I had unlimited excuses to not make them at home.

Its only later on in life that I realised that these are the basics to Indian cooking and when the basics don't have the right flavor - how will the recipe be perfect? So here I am today - making my own pastes at home.

Try it to know the difference. I know its difficult to convince yourself, but its very easy and thats the main reason I started it.


GingerGarlic


Ginger Paste

Wash, peel and chop ginger. Grind along with a tblsp of vinegar(for preservative) to a fine paste. Store in an air-tight jar for upto 3-4 months.

Garlic Paste

Wash, skin and chop garlic. Grind along with a tblsp of vinegar(for preservative) to a fine paste. Store in an air-tight jar for upto 3-4 months.

Ginger-Garlic Paste

Take equal amounts of both (100 gm Ginger, 100gm Garlic). Wash, peel and chop ginger. Wash, skin and chop garlic. Grind along with a tblsp of vinegar(for preservative) to a fine paste. Store in an air-tight jar for upto 3-4 months.

Gujiya


This is a typical Holi snack which my mom always made and I enjoyed it a lot. I only like my mom's gujiyas. The process is very elaborate but the result is very yummy. All my friends still miss my mom's gujiyas on Holi. I too make Gujiya every Holi using her recipe.

Gujiya


Preparation Time: 1 1/2 - 2 hrs
Cooking Time: 30 min
Makes: 15-20 pieces

Ingredients:

For Dough
3 cups Maida / All Purpose Flour
3 tblsp ghee / oil
Salt to taste

For Filling
200 gm Khoya
1 cup Sugar
2 tblsp Suji / Rava
2 tsp Khus-khus
1/4 dry cocount, grated
1/2 cup kishmis, Almonds and Cashews
1/2 tsp Elaichii powder
1 tblsp Ghee


Method:

  1. Heat 1 tblsp ghee.
  2. Fry kishmis, cashews, khas-khas and grated coconut separately and keep aside. Ensure that you fry coconut and khas-khas last as it uses up all the ghee. They need to fried for about 2-3 min each.
  3. Fry suji/rava and khoya separately till golden. Depending on the type of khoya - fry it for about 10-15 min. If it gets too dry then the gujiya filling will be very dry.
  4. Cool all the above fried ingredients.
  5. Mix everything together along with sugar and elachii powder. Keep this filling aside.
  6. Knead the ingredients under For Dough with water to a hard dough.
  7. Make balls and roll them out. The size depends on what size gujiyas you want.
  8. Now we need to make the gujiyas D-shape and fill it. I always use a gujiya maker that I got from India for this. Here in US, you get a dumpling maker which can be used with equal ease. You can also fold it to a D-Shape using your hand.
  9. Using a Gujiya/Dumpling maker - Take a puri and place it on the maker. The puri size has to be bigger than the maker round size. Put a spoonful of filling in the center. Dip your finger in water and spread this water all around the edge of the maker. Carefully close the maker ensuring no filling comes in the sealing edge. Press lightly to seal the gujiya. Open the maker and remove the gujiya.
  10. By hand - Put a spoonful of the filling in the center of the puri. Dip your finger in water and spread this water all around the edge of the puri. Now seal the ends by bringing one half over the other. Press the edge lightly. If you want a designed edge, start from one end folding the edge towards the inside in a spiral form till you reach the other end.
  11. Heat oil for deep frying gujiyas and deep fry them on medium heat. While you are frying keep the rest of the gujiya's covered so that they don't dry.

Tips

  • Ensure that no filling comes in between the sealed edges or else the gujiya will open during frying and the filling will be in oil. You need to change oil if this happens or else this filling will get stuck on any gujiyas you fry. While closing if any filling comes out, and believe me it does even with experts, then use another fresh puri and put this gujiya inside that and seal like a regular gujiya.
  • Make the filling a day in advance and the gujyas next day so it isn't as tiring.
  • Make all gujiyas and then deep fry them as you can't make them as fast as they fry. You need to keep the made gujiyas covered with a thick cloth/plastic cover during this time to prevent drying.
  • I normally make Papdi's the same day as Gujiya as I use the leftover Gujiya dough to make papdi's. I normally make more Gujiya dough so that it is definitly left-over.
  • Here's a photo of a dumpling maker you find here.
  • DumplingMaker

Publishing this again to send it off to Purva's Holi Hai Event

Freezing Food


My mom never used frozen foods. It was always fresh vegetables. So we always did a weekly vegetable shopping.

Since the concept of frozen food was new to me, when I saw frozen foods, I always thought that frozen vegetables do not have the same nutrients as their fresh counterparts. I started using them often once I came here and started work. You don't have a maid at home who can do all the cutting and cleaning for you. So frozen food is a blessing to a working woman. But it always gave me a sense of guilt that I was not giving the best nutrients to my family. So I did my research on frozen vs fresh and was pleasantly surprised to find that frozen food have the same nutrients as fresh. How soon after being harvested was it frozen is the question that decides the quality of frozen food. The nutrients do not reduce during the freeze period. Here is a link to one of the sites I checked. Well from then on - I have been very happy about using frozen vegetables for cooking everyday food.

You get frozen food in the freezer section of all grocery stores. This would be the best according to me as fresh food gets frozen very soon after harvest if it is being harvested for freezing. The more the time spent outside soil, the lesser the nutrients. But if you want to freeze vegetables yourself, you can do that too. Infact many vegetables can be just washed, cut and frozen. Some need blanching.

Remember a few ground rules though:

• If you are buying frozen vegetables from the market, tranfer them to the freezer as soon as you get home.

• If freezing at home, ensure you remove all air from the freezer bag when closing it to prevent freezer burn.

• If you feel that the vegetables have gone bad, trash it.

Process of freezing

Blanch or steam all vegetables and cool them quickly in ice water before freezing. This step inactivates enzymes that will damage flavor, nutrients and texture during freezer storage.

Process of packing

All packing has be air tight and with as little air as possible. Here in US you g et very convenient zip-lock bags which are ideal for this.

Thawing

I prefer thawing overnight in the fridge. But if you have forgotton and need it immediately, microwave in slow increments of 1-2 min checking inbetween.

Some Common Vegetables

Asparagus Wash well and cut off the tough portions. Depending on the thickness of the stem, blanch for 2-4 min. Cool in ice water for 2-3 min and pack.
Beans Wash well and cut into sizes you want. Blanch for 2-3 min. Cool in ice water for 1 min and pack.
Broccoli Wash well and break flowers into smaller sizes. Blanch for 2-3 min. Cool in ice water for 2-3 min and pack.
Cabbage Remove outer leaves and wash well. Chop into desired sizes - pieces or shred. Blanch for 1 1/2 - 2 min. Cool in ice water for 1-2 min and pack.
Carrots Peel, wash and cut/shred as you want. Blanch for 2-3 min. Cool in ice water for 2-3 min and pack.
Cauliflower Wash and divide into florets. Blanch for 3 min. Cool in ice water for 3 min and pack.
Celery Wash and cut as desired. Blanch for 2 min. Cool in ice water for 2 min and pack.
Cilantro / Dhaniya leaves I haven't been able to freeze this. But you can make it last longer by chopping it and storing it in a paper towel in your fidge. Its lasts about 10-12 days.
Chillies Wash and dry. Pack and freeze.
Cucumber Wash, peel and cut as desired. Pack and freeze.
EggPlant / Baingan Wash and cut as desired. Blanch for about 2 min. Cool in ice water with lemon juice in it (about 1 tsp in a quart of water). Pat dry and pack.
Garlic Separate bulbs. Pack and freeze.
Ginger Wash and cut into desired sizes. Pack and freeze.
Kadi Patta / Curry Leaves Wash and dry. Pack and freeze. Retains its flavor.
Mushrooms Pack and freeze.
Okra / Ladyfinger Wash and cut into desired size. Blach for about 3-4 min and cool in ice water for 3-4 min. Pack and freeze.
Onion Remove outer skin, wash and chop as desired. Pack and freeze.
Green Peas Wash well. Blanch for 1 min and cool in ice water for 1 min. Pack and freeze.
Paneer / Indian Cottage Cheese Cut into desired sizes. Pack and freeze. Paneer tends to stick to one another. So wrap portions individually, so you can take one portion out and thaw it.
Pepper / Capsicum Wash, remove seeds and chop as desired. Pack and freeze.
Potato Potatoes should be cooked and then freezed. You can cut them into desired size, boil until cooked, cool, pack and freeze.
Pumpkin / Kaddu Pumpkin should be cooked and then freezed. You can cut them into desired size, boil until cooked, cool, pack and freeze.
Spinach Wash well and remove stems. Blach in small quantities for 1 min. Cool in ice water for 1 min. Pack and freeze.
Tofu Cut into desired sizes. Pack and freeze. Tofu sometimes changes color on freezing but thats fine. This color change depends on the kind of Tofu used. Tofu tends to stick to one another. So wrap portions individually, so you can take one portion out and thaw it.
Tomatoes Wash, remove stems and cut into halves/quarters. Pack and freeze.


Almost anything can be frozen. I have freezed cooked curries and batters for upto a month. And they stayed fresh. Its just a process of trial and error. If at any time you feel something has gone bad, trash it and its a lesson well learnt.